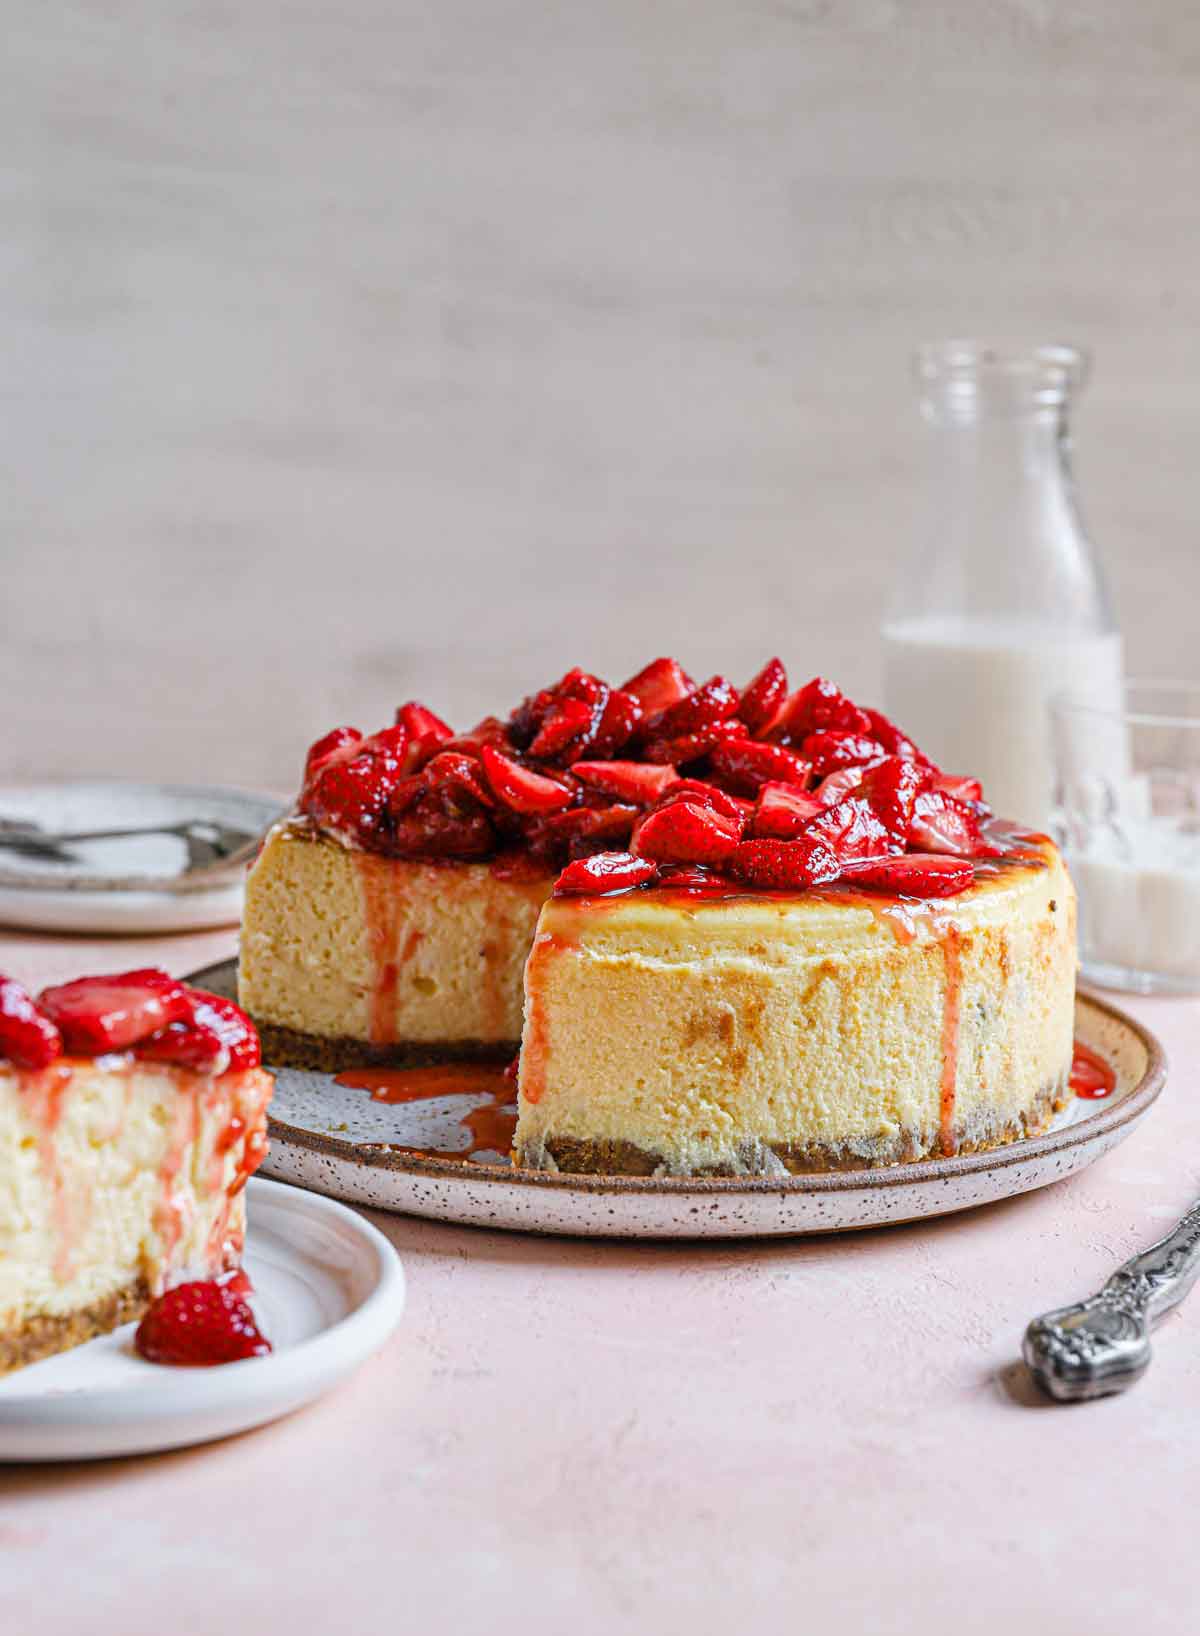
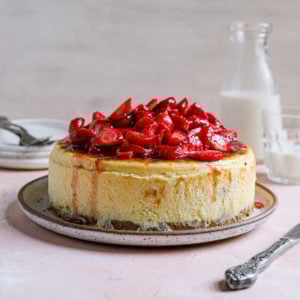
New York Cheesecake
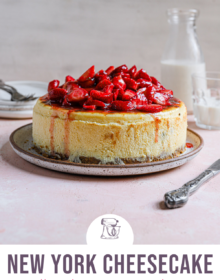
Follow this classic New York Cheesecake recipe for a creamy, rich, and decadent dessert. Serve it plain or with your favorite cheesecake toppings (lots of suggestions below) for an impressive holiday, birthday, dinner party, or special occasion dessert!
Cheesecake is one of my great loves. Over the years, I've shared many, many cheesecake recipes, including brownie cheesecake, Oreo cheesecake, fig almond cheesecake, pumpkin cheesecake, red velvet cheesecake, and peanut butter fudge cheesecake (among others!).
Today, we're taking a deep dive into the ultimate cheesecake recipe: New York-style cheesecake with a classic graham cracker crust and a sky-high cheesecake filling.
Why Homemade Cheesecake Is the Best
While homemade cheesecake can be a little time-consuming and look a little intimidating, it's a great recipe for bakers of any level. It doesn't require very much hands-on time. Many cheesecake recipes require baking cheesecake in a water bath to ensure an even bake and reduce the risk of cracks forming on the top of the cake, but you won't need to use a hot water bath to make this recipe (which is one of the things I love about it)!
There are two parts to cheesecake - both simple to make with basic baking ingredients; a traditional graham cracker crust and ultra-creamy cheesecake filling.
If you've ever tasted cheesecake from scratch, you know the results are absolutely, 100% worth it!
“Regular Cheesecake” vs New York Cheesecake
Almost every style of baked cheesecake has a base of cream cheese and eggs. The difference lies in the amount of cream cheese and the addition of sour cream.
"Regular" cheesecake is traditionally lighter in texture and baked to pale perfection. For a classic cheesecake recipe (not New York style) try my Oreo cheesecake recipe. Simply omit the Oreo cookies for a plain version.
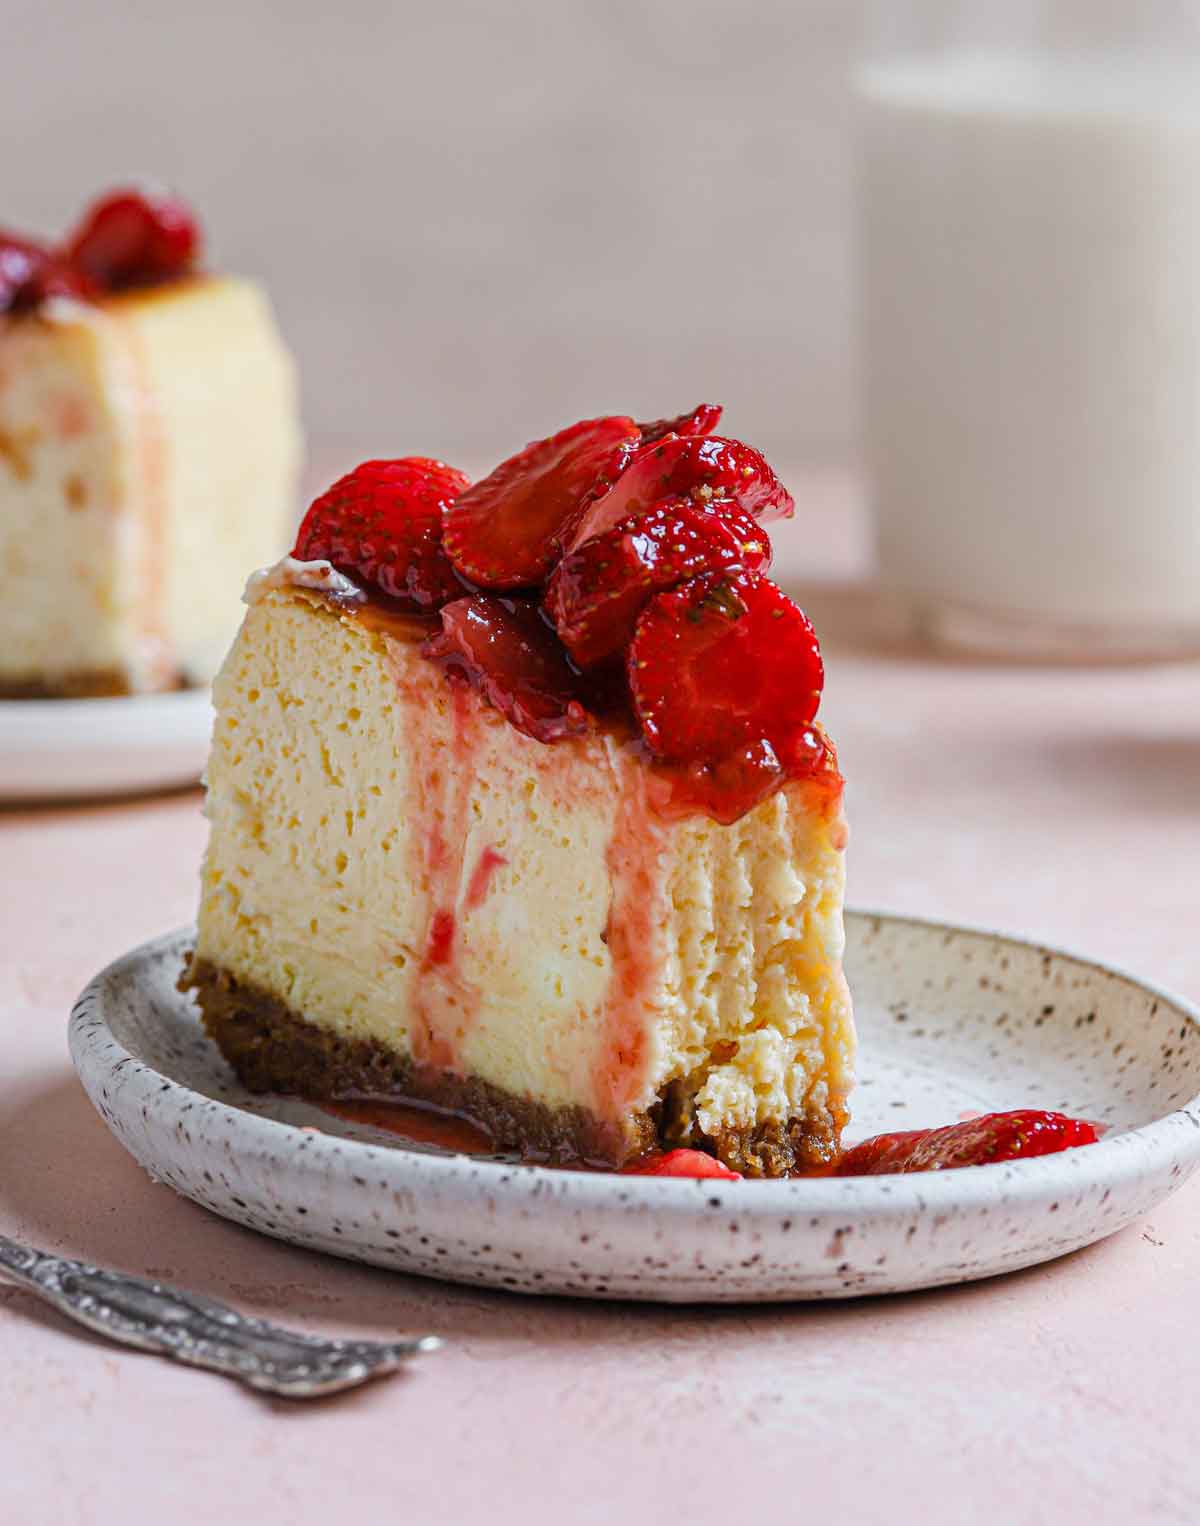
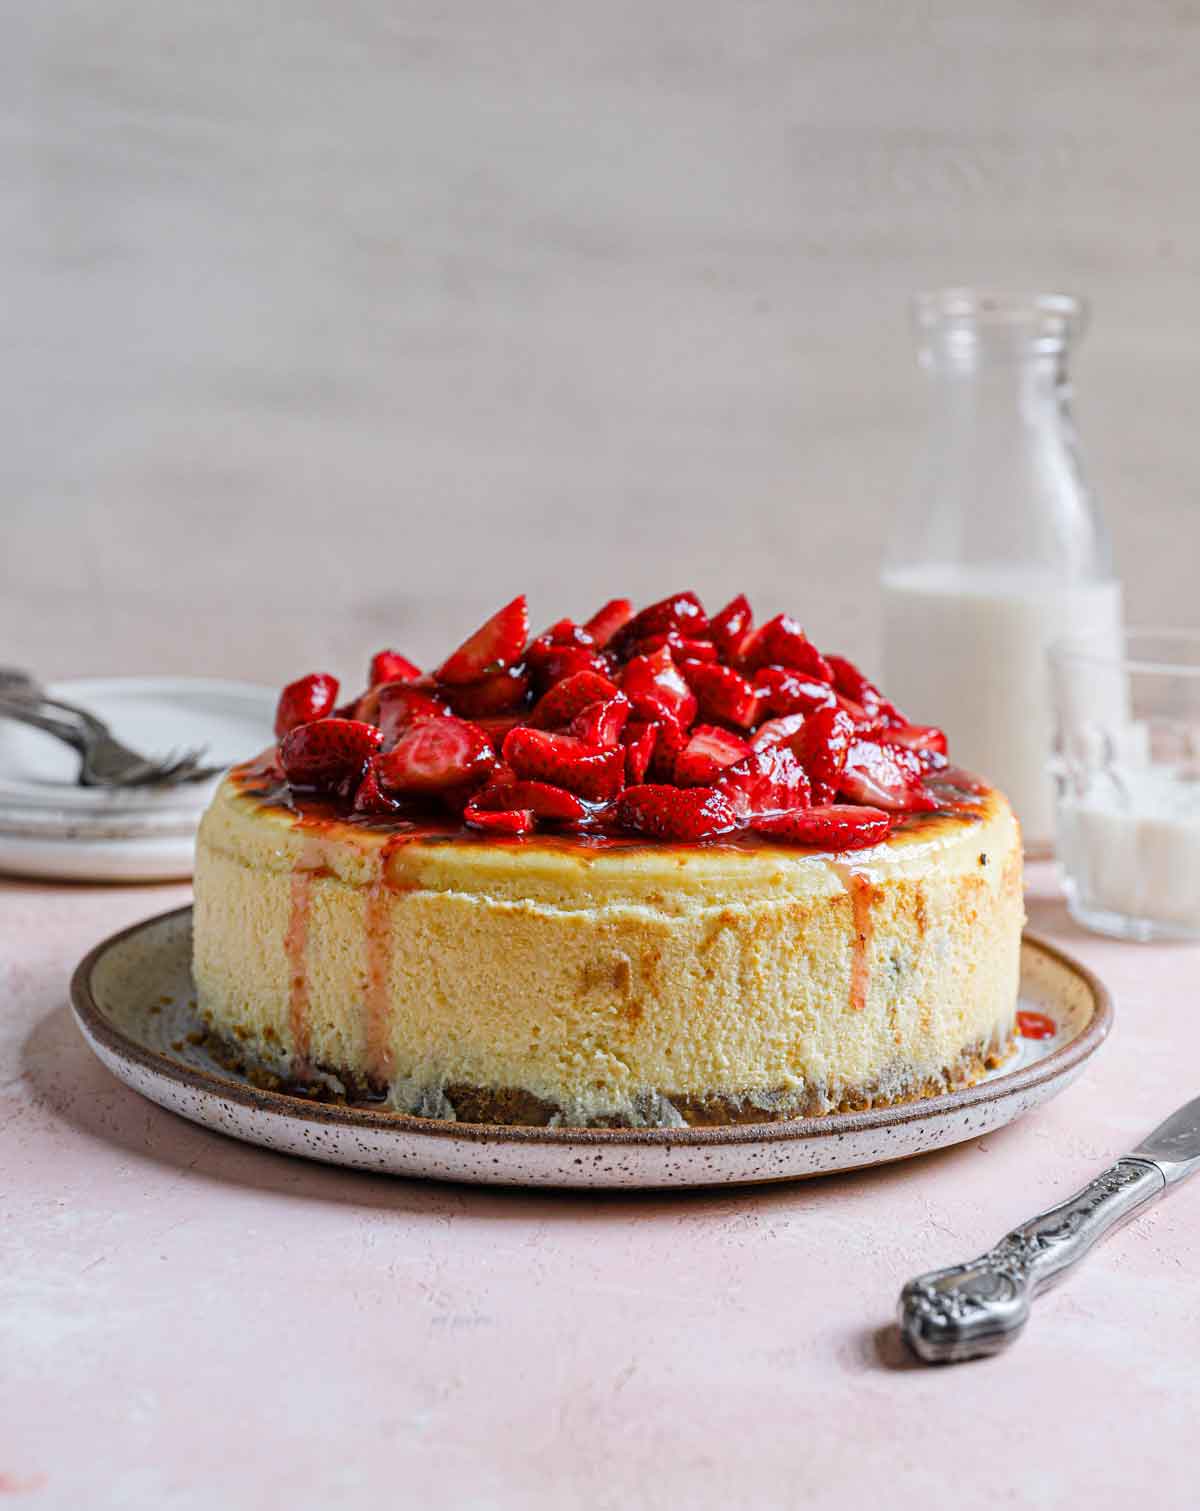
New York-style cheesecake is made with more cream cheese than regular cheesecake; it's typically denser and richer and is sometimes browned on top. (Side note: another variation of New York cheesecake involves baking a layer of sour cream on top of the cheesecake at the end.)
Simple Ingredients
The beauty of a classic cheesecake is that it relies upon a simple list of ingredients to create rich decadence! I’ve highlighted some of the important ones below. As always, check the recipe card below for a full list of ingredients and quantities.
- Graham Crackers (for the crust) – You can use store-bought graham cracker crumbs or crush up whole graham crackers.
- Cream Cheese – Be sure to use full-fat cream cheese for a cheesecake that is firm and creamy, not watery or runny.
- Sour Cream – Again, use full-fat sour cream.
- Lemon Juice – Fresh or bottled is fine; the flavor is very subtle, but you can omit it if you prefer.
How to Make New York Cheesecake
Complete instructions for making this delicious New York cheesecake recipe are in the recipe card at the bottom of this post, but here's a quick recap:
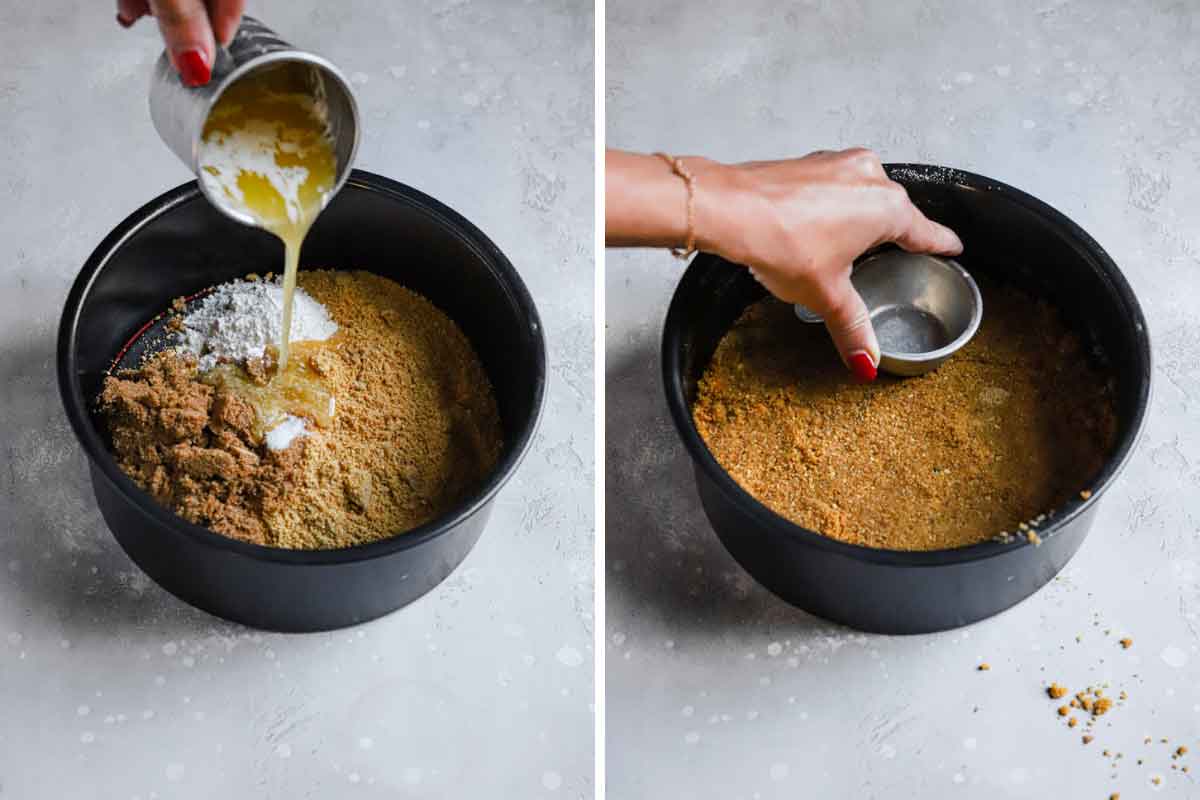
Step #1: Make the Crust – Mix together the graham cracker crumbs, brown sugar, salt, and melted butter, then press into the bottom and about an inch of the way up the prepared pan. (If you want to double the crust, you can press it higher up the pan.) You will then bake the crust and set it aside to cool while you make the filling.
Step #2: Make the Cheesecake Filling – You will mix together the filling ingredients (cream cheese, sugar, sour cream, lemon juice, vanilla extract, and eggs), then pour the cheesecake batter into the prepared crust.
Save This Recipe
Step #3: Bake Low and Slow – Bake at 200 degrees F until the cheesecake reaches 150 degrees F on an instant-read thermometer. This takes anywhere from 2 hours 15 minutes to 3 hours.
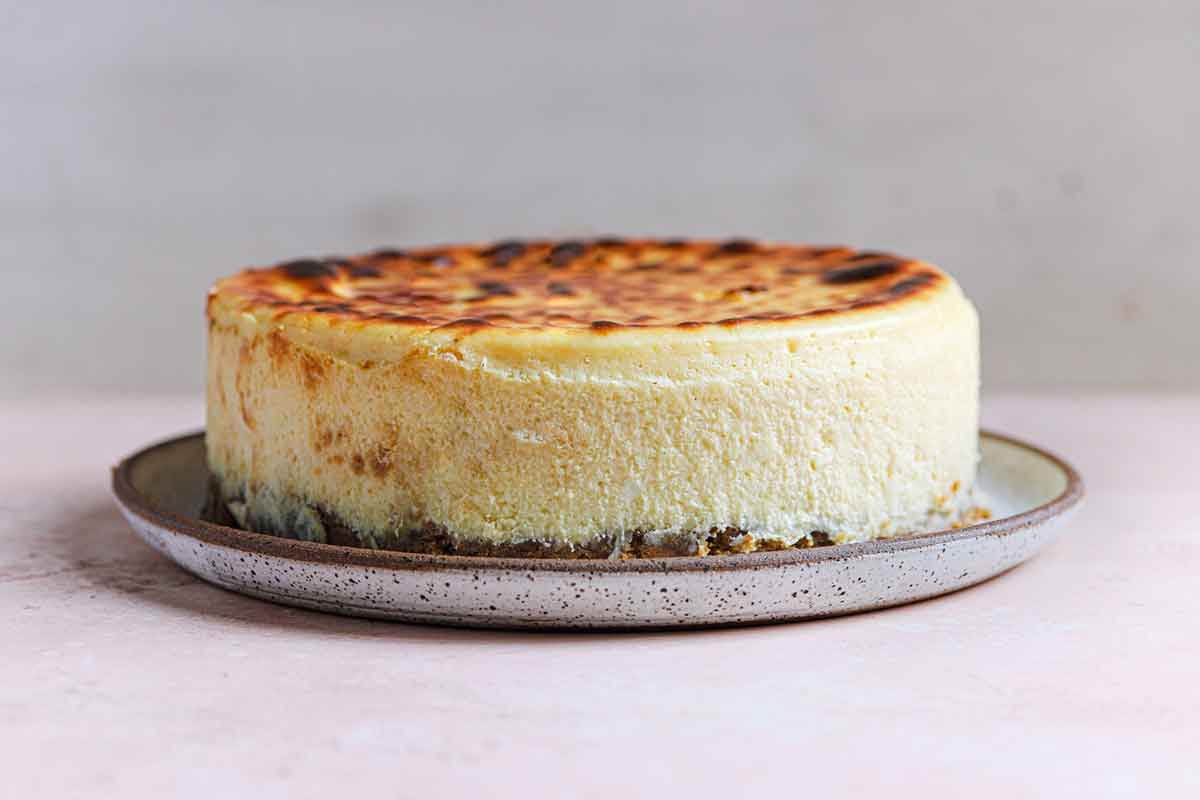
Step #4: Brown the Top – Increase the oven temperature to 500 degrees F and pop the cheesecake back in the oven for a few minutes to get a classic browned top (or skip this step if you prefer a paler top!).
Step #5: Chill – This is a crucial step! Let the cheesecake cool completely to room temperature, then refrigerate for at least 6 hours or overnight.
Revised and Updated Cheesecake Baking Method
The Original Recipe: Many of you may be familiar with the original form of this cheesecake recipe that I published in 2013. That recipe required you to start baking the cheesecake at 500 degrees F for 10 minutes, then lower the temperature to 200 degrees F for the remaining baking time. I've received a mixed bag of comments and reviews over the years - some readers comment that it turns out perfectly, while others say the cheesecake was completely burnt on top. I couldn't identify where to make changes to the recipe because every time I made it, it turned out wonderfully.
So, I re-tested it in a new-to-me oven. And it burned… and cracked. I was stumped after making so many successful cheesecakes following this method, so I did a ton of reading and research.
As it turns out, the time it takes your oven to drop in temperature makes all the difference. All ovens vary in the amount of time it takes to drop in temperature, and in this particular recipe, we're dropping the temperature by 300 degrees F. If your oven lowers in temperature quickly, you likely would not have had a problem. However, if an oven takes a long time to drop the temperature, the cheesecake bakes at a higher temperature for too long, resulting in a too-dark and cracked top.
The Updated Recipe: Since a slightly toasted top is characteristic of a New York cheesecake, I wanted to figure out how to make this work. As it turns out, Cook's Illustrated also re-visited this recipe and flipped the order of baking. START the cheesecake in an oven at 200 degrees F and finish the cheesecake at 500 degrees F for a few minutes to get that classic browned top.
This also provides another benefit - if you like a purely pale cheesecake without any color on top, you can completely skip the last step of browning with no other adjustments needed!
Topping Ideas
While a fabulous cheesecake can absolutely stand on its own, sometimes it's nice to dress it up a bit when serving to others (you could even set up a cheesecake topping bar!). You'll find a recipe for fresh strawberry topping included with the cheesecake recipe below, and here are some other cheesecake topping ideas:
- Homemade whipped cream (or from a can!)
- Salted caramel sauce (homemade is linked, or store-bought)
- Hot fudge sauce (homemade is linked, or use store-bought)
- Chocolate ganache
- Fresh fruit – Blueberries, cherries, raspberries, blackberries, etc.
- Canned pie filling – Spoon some over top of the entire cheesecake, or just individual slices.
- Fruit compote
- Powdered sugar
- Crushed Oreos or other cookies/candy
- Chocolate shavings
How to Store and Freeze Cheesecake
- Storage: Keep the cheesecake in an airtight container or wrapped in plastic wrap in the refrigerator for up to 4 days.
- To Freeze the Entire Cheesecake: Chill overnight in the refrigerator, wrap in plastic, then wrap in aluminum foil, and place in a zip-top freezer bag. Freeze for up to 3 months. Thaw in the refrigerator overnight before serving.
- To Freeze Slices of Cheesecake: Wrap each slice individually in plastic wrap, then place in a zip-top freezer bag. Freeze for up to 3 months. Thaw in the refrigerator overnight or at room temperature for about 45 minutes.
Recipe Notes & Success Tips
- Mixer: This recipe comes together best when you use an electric mixer; while a stand mixer makes an easy job of it, you can also use a hand mixer if that is all you have, just be sure to use a large mixing bowl!
- Springform Pan: To make this deep dish New York cheesecake recipe, a springform pan is essential. Using this pan will give your cheesecake height and, because the outer ring is separate from the base, the sides stay smooth when you release it after cooling. (It's impossible to get a baked cheesecake out of a regular cake pan without it breaking apart into pieces.)
- Thermometer: An instant-read thermometer is the absolute best way to ensure your cheesecake is done but not overdone. The cheesecake will continue to cook as it cools, so we're looking for 150 degrees F; baking to this internal temperature will give you the most amazingly creamy cheesecake. If you do not have an instant-read thermometer, gently shake the pan - you want a circular area of about 2 inches in the center to still jiggle slightly.
- Browned Top: As mentioned above, you can skip the browning step completely if you'd like. If you DO plan on browning the top, be sure to keep a close eye on it because it will brown quickly. I find that it darkens a shade or two after cooling, so keep that in mind, as well. Err on the side of removing it earlier rather than later.
- Chill: A thoroughly chilled cheesecake is best! While 6 hours is the minimum, overnight is even better. (Which is awesome, because cheesecake is the ultimate make-ahead dessert!)
Watch the Recipe Video:
If you make this New York cheesecake recipe and love it, remember to stop back and give it a 5-star rating - it helps others find the recipe! ❤️️
New York Cheesecake Recipe
Ingredients
For the Crust:
For the Cheesecake Filling:
- 40 ounces cream cheese, at room temperature and cut into 1-inch pieces
- 1½ cups (298 g) granulated sugar, divided
- ⅛ teaspoon salt
- ⅓ cup (76 g) sour cream
- 2 teaspoons lemon juice
- 2 teaspoons vanilla extract
- 2 egg yolks
- 6 eggs
For the Fresh Strawberry Topping:
- 2 pounds strawberries, hulled and cut into ¼-inch slices (about 3 cups sliced strawberries)
- ½ cup (99 g) granulated sugar
- Pinch of salt
- 1 cup (340 g) strawberry jam
- 2 tablespoons lemon juice
Instructions
- Preheat oven to 325 degrees F. Lightly grease the bottom and sides of a 9-inch springform pan.
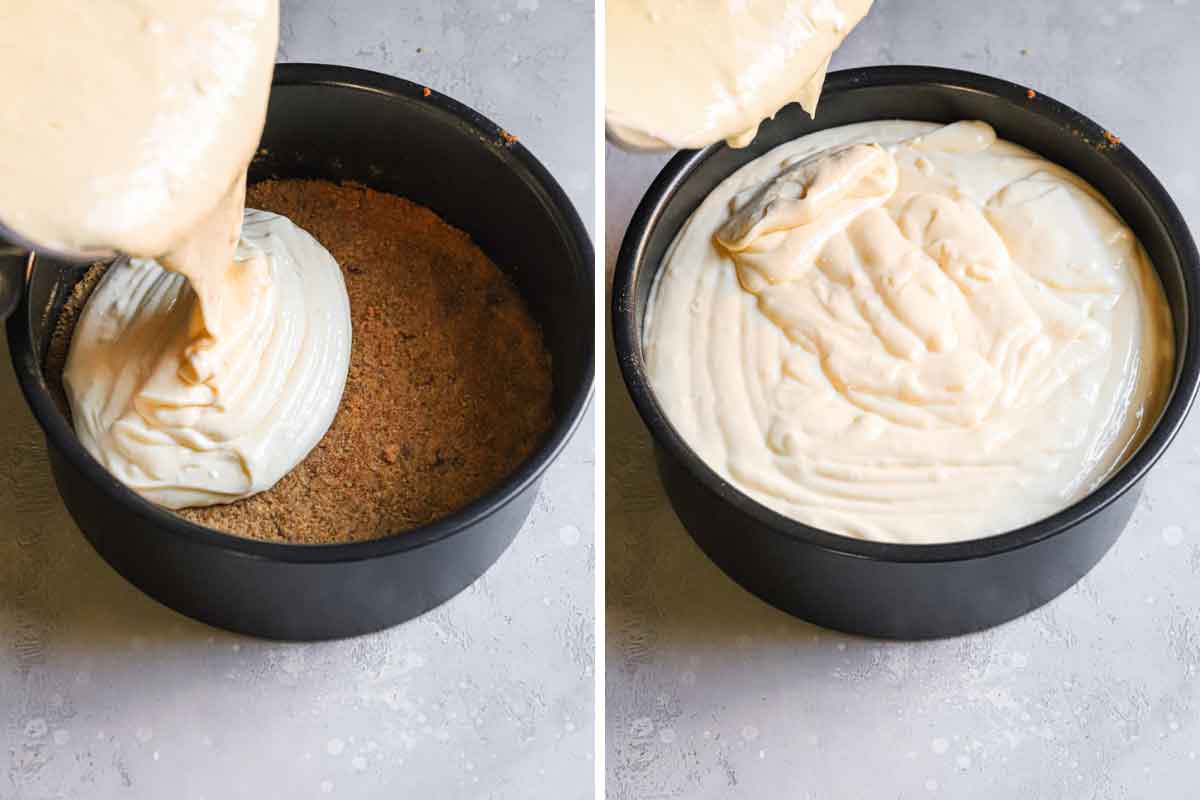
- Make the Crust: In a medium bowl, stir together the graham cracker crumbs, brown sugar, and salt. Pour in the melted butter over the mixture and stir with a fork or rubber spatula until the entire mixture is moistened. Press evenly into the bottom and up the sides of the prepared springform pan and bake until the edges begin to lightly brown, 11 to 13 minutes. Set aside to cool completely.
- Reduce oven temperature to 200 degrees F. Adjust oven rack to lower-middle position.
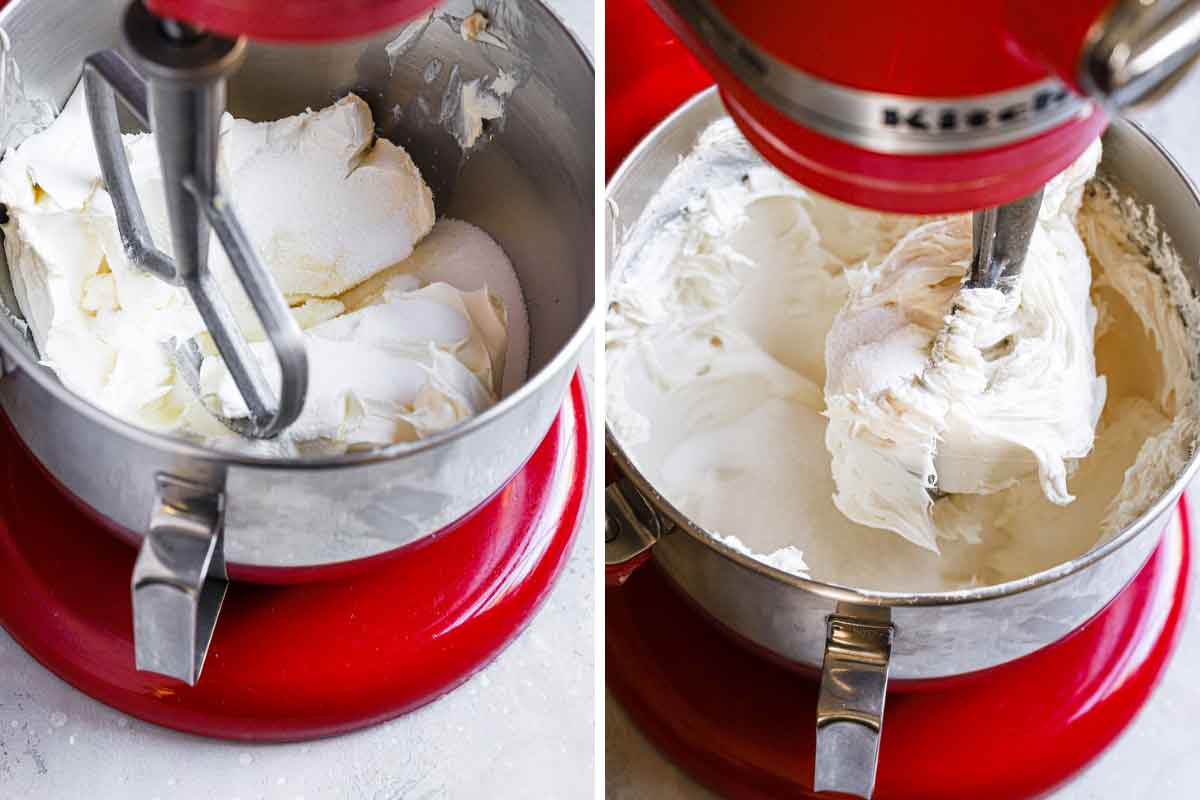
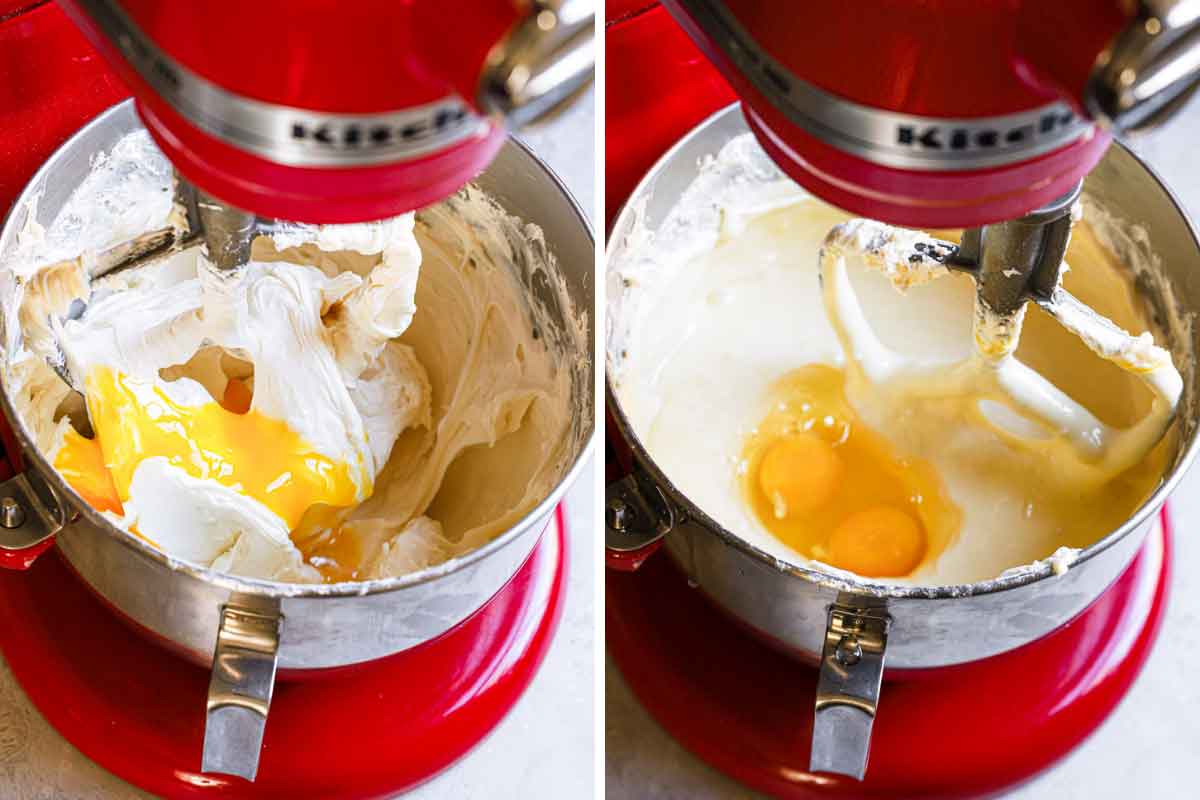
- Make the Cheesecake Filling: Beat the cream cheese, ¾ cup of the sugar, and the salt on medium-low speed until combined, about 1 minute. Beat in the remaining ¾ cup of sugar until combined, about 1 minute. Scrape down the sides of the bowl and the beater. Add the sour cream, lemon juice, and vanilla extract and beat on low speed until combined, 1 minute. Add the egg yolks and beat at medium-low speed until thoroughly combined, 1 minute. Scrape the bowl and beater well. Add the whole eggs two at a time, beating for 30 seconds after each addition.
- Pour the filling over the crust and place the springform pan on the lower-middle rack. Place a rimmed baking sheet on the rack below to catch any drips. Bake until the cheesecake registers 150 degrees F on an instant-read thermometer, 2 hours 15 minutes to 3 hours.
- Remove the cake from the oven and increase the oven temperature to 500 degrees F (leave the rimmed baking sheet on the bottom rack).
- Once the oven reaches 500 degrees, place the cheesecake on the upper-middle rack. Bake until the top is lightly browned, 3 to 8 minutes. Remove from the oven, place on a wire rack and allow to rest for 5 minutes. Run a paring knife between the cheesecake and the side of the springform pan, then allow to cool to room temperature, at least 3 hours. Cover with plastic wrap and refrigerate until completely chilled, at least 6 hours but ideally overnight.
- Remove the sides of the springform pan and allow to sit at room temperature for 30 minutes before serving.
- To Make the Fresh Strawberry Topping: In a large bowl, toss together the sliced strawberries and the sugar. Let sit for 30 minutes, stirring occasionally to combine.
- Process the jam in a food processor until smooth, about 10 seconds (or, whisk vigorously until the jam is completely smooth). Place the jam in a small saucepan and bring to a simmer over medium-high heat. Simmer, stirring frequently, until the jam is dark and no longer frothy, about 3 minutes. Stir in the lemon juice, then pour over the strawberries and stir to combine. Allow to cool to room temperature, then cover with plastic wrap and refrigerate until cold, at least 2 hours or up to 12 hours (the strawberry topping is best served within 1 day of making it).
Notes
- Springform Pan: To make this deep dish New York cheesecake recipe, a springform pan is essential. Using this pan will give your cheesecake height and, because the outer ring is separate from the base, the sides stay smooth when you release it after cooling. (It's impossible to get a baked cheesecake out of a regular cake pan without it breaking apart into pieces.)
- Thermometer: An instant-read thermometer is the absolute best way to ensure your cheesecake is done but not overdone. The cheesecake will continue to cook as it cools, so we're looking for 150 degrees F; baking to this internal temperature will give you the most amazingly creamy cheesecake. If you do not have an instant-read thermometer, gently shake the pan - you want a circular area of about 2 inches in the center to still jiggle slightly.
- Browned Top: As mentioned above, you can skip the browning step completely if you'd like. If you DO plan on browning the top, be sure to keep a close eye on it because it will brown quickly. I find that it darkens a shade or two after cooling, so keep that in mind, as well. Err on the side of removing it earlier rather than later.
- Chill: A thoroughly chilled cheesecake is best! While 6 hours is the minimum, overnight is even better. (Which is awesome, because cheesecake is the ultimate make-ahead dessert!)
- Storage: Keep the cheesecake in an airtight container or wrapped in plastic wrap in the refrigerator for up to 4 days.
- To Freeze the Entire Cheesecake: Chill overnight in the refrigerator, wrap in plastic, then wrap in foil, and place in a zip-top freezer bag. Freeze for up to 3 months. Thaw in the refrigerator overnight before serving.
- To Freeze Slices of Cheesecake: Wrap each slice individually in plastic wrap, then place in a zip-top freezer bag. Freeze for up to 3 months. Thaw in the refrigerator overnight or at room temperature for about 45 minutes.
Did you make this recipe?
Leave a review below, then snap a picture and tag @thebrowneyedbaker on Instagram so I can see it!
This recipe was originally published in April 2013.
Photography by Dee Frances.


500 F is too high. I turned the oven down after 6 mins. when it started to burn. the entire cake is charred. Complete waste of expensive ingredients. do not follow this recipe.
Hi! I love your recipes, they are my go to when making desserts! :) My question is one that you have sort of answered before but wondering if you had any other insight. So I’m using this recipe to make cupcake sized cheesecakes and making a variety of sauces to choose from (like a cheesecake bar) :-) I was wondering if you had insight into how long and what temp to cook the crust and cheesecake? Should I use your tiramisu cheesecake cupcakes recipe as a guide? Also, I have a regular and convection oven…would you recommend using one over the other?
Thanks for your input! :-)
Hi Heather, Yes the tiramisu cheesecakes would be a great guide! I always use my regular oven, I haven’t seen consistent good results with convection yet (although it could just be my oven!).
This is the platonic ideal of cheesecake. Look no further.
Flavor and texture are wonderful. More cream cheese than seems reasonable, because this is a Cheese Cake, not a cake with cheese. Enough sugar, not too much. Lemon is not really detectable, but it brightens and balances everything perfectly. I used homemade Tahitian vanilla extract (upped it to 1 tbsp) – if you have fancy vanilla, now’s the time to bust it out, this is the perfect vehicle to show it off. I imagine other extracts would be good here too, if you wanted to experiment with flavors.
The top gets quite brown during the initial 500° bake, but it doesn’t burn, don’t worry. I did get a couple cracks, and some air bubbles due to overzealous mixing of the batter. But I’m not making this for the cover of Cheesecake Magazine, and the aesthetic “problems” don’t bother me or my cheesecake-eaters at all. I checked doneness via thermometer, and the only time it came out slightly less than perfect was when I overshot the end temperature: the outer edges got a bit firmer and cakey-er than the silky creamy center. This was only noticed, by my cheesecake-connoisseur husband, because the first two times the whole cake had the texture of a Lindor Truffle.
This is the platonic ideal of cheesecake.
I’m so thankful to have found this on your website!! Your chocolate ganache cheesecake has been the only cheesecake EVER that has turned out for me. I seem to fail at water baths every. Single. Time.
And then my mother-in-law requested a standard traditional cheesecake with strawberries for her birthday…
I was terrified I was hosed. I brought up your trusty chocolate recipe hoping I could maybe just omit the chocolate only to find this one!! And it doesn’t require a water bath!! Thank you thank you!!
I made this recipe as written except I added orange and lemon zest. My topping was a mixture of raspberry mango jam and strawberries. My nephew loves cheesecake, he requested one for his birthday. It was amazing.
Throwing away old recipe per my families request and using this going forward! Awesome recipe!!!!
After the 10 minutes the top looks burnt :(
Do you happen to use a convection oven?
This was my first attempt at making a cheesecake and it turned out fabulous! Thank you so much for sharing your recipes with everyone. It was perfect!!!
I’ve made this twice and both times I still ended up with cracks. I may just have to try the water bath method to see if the result is any different.
what pan size would you recommend to use for this recipe?😅
Hi Kristian, A 9-inch springform pan (noted in step #1).
The 500 degrees is NOT a good idea. It will turn the top of the cheesecake like it did mine.
Hi! I made this cheesecake for my sons 18 birthday, it was amazing!!!!! 😋😍Thanks for recipe. Definitely my all time fav recipe for NY style cheesecake. 😎
Hi, Michelle!
This recipe states that it needs 2 pounds of strawberries for topping about 3 cups, but 3 cups of sliced strawberries is only one pound not two. So, how many pounds of strawberries exactly one has to use in this recipe? Thank you. Please, answer. I lately do not get any answers to my questions. I’d highly appreciate it. I like your recipes.
Hi Yelena, The size of the strawberries and how they are sliced could definitely affect the yield you get. I would go with the 3 cups sliced, however many pounds it is. I list both to help guide how many strawberries should be purchased. And I apologize about any unanswered questions; I do try to reply to any questions within 48 hours, so apologies if one of your slipped through the cracks!
So, I’ve made this a couple of times because I really love it. Thing is, every time I’ve made it the top is browning a decent amount. The consistency is coming out great, it doesn’t appear to be overcooked or anything. Is there anything else I could change to help w/ this? Would I wanna adjust the high temp cooking time or the low temp cooking time or something else?
Hi Amanda, You could try covering the top with foil during that initial hot burst, which could help keep it from browning so much. If you do that, let me know how it works for you!
polish restaurant in New Britain, CT “Staropolska Restaurant” has used your picture on their facebook page. Did you allow them to use it or they just simply stole it? Go to their fb page and find post from June 9th 2017
I love how this looks in your pictures! Mine is currently baking at 200 degrees after the initial 10 mins at 500. I do have an oven thermometer and I’m experiencing the same problems as others – Dark brown top after 20 mins in oven and cracks. So sad. Foil is on so I’m hoping for some salvaging…sighhhh
I wonder how wiggly it should be after the suggested bake time. I didn’t use a water bath. But I did put o pan of water on the bottom of the oven. And mistakenly used 1/2 cup of sour cream.
Hi Maureen, I definitely use the thermometer for this recipe to ensure it will set properly, but it should jiggle slightly… it shouldn’t be firm but not totally liquid.
Could you make a sugar Free cheese cake?
Hi Deborah, I never have, I’m not sure how it would turn out!
I made my first cheese cake ever with this recipe! Ingredients and flavor were great (though I would use 1/4 of the sugar in a future strawberry topping.) One big problem: the baking time. The cake was really dark after 45 min of baking. I followed the directions and turned the oven down to 200 after 10 min, I had even bought an oven thermometer to make sure the temp was on track. I ultimately registered the temp in the center of the cake, it was 160. I took it out after only 50 minutes. The sides of and external edges of the crust were burnt. Cheese cake a bit over done, but still got rave compliments :)
Hello, the joyofbaking website has actually this same recipe more or less, but also an added “topping” which i would say is essential.
Very strange that this isnt in this recipe as that process with taking the cake shortly out to add a thin top layer with lemon/vanilla sourcream makes alot for the cake.
This cheesecake looks perfect!!
My most requested cake is the snickers cake that you posted, it’s absolutely fantastic so I’ll follow any recipe of yours :)
My question is, can I double or triple the crust portion and bring it all the way up the sides? Do you think that will work out?
Thanks!
Hi Carolyn, Yes, you could definitely increase the crust (a girl after my own heart!).
The crust up the sides worked out very well, but the same as quite a few comments above, the top is very dark brown and the top of the crust I built is BLACK.
What I should have asked you is if there is a high altitude difference? That’s the only thing I can think of.
I live at 5500ft
Hi Carolyn, Yes, it’s absolutely likely that altitude could have played a factor. I did a post on adjustments for high altitude baking here:
https://apex-male.info/high-altitude-baking-tips/%3C/a%3E%3C/p%3E
Hello! I was wondering if it would be possible to fold in some strawberries into the cheesecake before baking.
Hi Kayla, I haven’t tried it, but I think it should work. The only issue I could see is that they might release too much liquid during baking, which might make for a runnier batter and it could take longer to bake.
Hi,
I love this cheesecake, the texture is wonderful. I have also made a Cooks Illustrated Lemon cheesecake that I love, but you do have to use a water bath, and I prefer the texture of your New YorkStyle Cheesecake.
I would need to add more lemon juice and 1 TBS lemon zest. Do you think I will need to adjust any of the ingredients to do this? Any suggestions would be appreciated.
Thank you, I love your recipes,
Jo
Here is the recipe:
Lemon Cheesecake – Cook’s Illustrated –Made this one Dec. 2011
I have a lemon cheesecake recipe from Cook’s Illustrated, and it’s the one that everyone usually goes nuts for. They are big on ”instruction” so it looks far more complicated than it really is.
Serves 12 to 16
While this recipe takes several hours from start to finish, the actual preparation is simple, and baking and cooling proceed practically unattended. The finished cheesecake should be chilled for at least 4 hours before being sliced, and it can be made up to a day in advance. Leftovers can be refrigerated for up to 4 days, although the crust will become soggy.
Crust
5 ounces Nabisco’s Barnum’s Animals Crackers or Social Tea Biscuits
3 tablespoons sugar
4 tablespoons unsalted butter, melted and kept warm
Filling
1 ¼ cups (8 ¾ ounces) sugar
1 tablespoon grated zest plus ¼ cup juice from 1 or 2 lemons
1 ½ pounds (three 8-ounce packages) cream cheese, cut into rough 1-inch chunks and left to stand at room temperature 30 to 45 minutes
4 large eggs, room temperature
2 teaspoons vanilla extract
¼ teaspoon salt
½ cup heavy cream
Lemon curd
1/3 cup juice from 2 lemons
2 large eggs plus 1 large egg yolk
½ cup (3 ½ ounces) sugar
2 tablespoons unsalted butter, cut into ½-inch cubes and chilled
1 tablespoon heavy cream
¼ teaspoon vanilla extract
Pinch salt
1. For the crust: Adjust an oven rack to the lower-middle position and heat the oven to 325 degrees. In a food processor, process the cookies to fine, even crumbs, about 30 seconds (you should have about 1 cup). Add the sugar and pulse 2 or 3 times to incorporate. Add the warm melted butter in a slow, steady stream while pulsing; pulse until the mixture is evenly moistened and resembles wet sand, about ten 1-second pulses. Transfer the mixture to 9-inch springform pan; using the bottom of a ramekin or a dry measuring cup, press the crumbs firmly and evenly into the pan bottom, keeping the sides as clean as possible. Bake until fragrant and golden brown, 15 to 18 minutes. Cool on a wire rack to room temperature, about 30 minutes. When cool, wrap the outside of the pan with two 18-inch-square pieces of heavy-duty foil; set the springform pan in a roasting pan.
2. For the filling: While the crust is cooling, process ¼ cup sugar and lemon zest in a food processor until the sugar is yellow and the zest is broken down, about 15 seconds, scraping down the bowl if necessary. Transfer the lemon sugar to a small bowl; stir in the remaining 1 cup sugar.
3. In a standing mixer fitted with the paddle attachment, beat the cream cheese on low to break up and soften slightly, about 5 seconds. With the machine running, add the sugar mixture in a slow steady stream; increase the speed to medium and continue to beat until the mixture is creamy and smooth, about 3 minutes, scraping down the bowl with a rubber spatula as needed. Reduce the speed to medium-low and add the eggs two at a time; beat until incorporated, about 30 seconds, scraping the sides and bottom of the bowl well after each addition. Add the lemon juice, vanilla, and salt and mix until just incorporated, about 5 seconds; add the heavy cream and mix until just incorporated, about 5 seconds longer. Give the batter a final scrape, stir with a rubber spatula, and pour into the prepared springform pan; fill the roasting pan with enough hot tap water to come halfway up the sides of the springform pan. Bake until the center jiggles slightly, the sides just start to puff, the surface is no longer shiny, and an instant-read thermometer inserted in the center of the cake registers 150 degrees, 55 to 60 minutes. Turn off the oven and prop open the oven door with a potholder or wooden spoon handle; allow the cake to cool in the water bath in the oven for 1 hour. Transfer the springform pan without the foil to a wire rack; run a small paring knife around the inside edge of the pan to loosen the sides of the cake, and cool the cake to room temperature, about 2 hours.
4. For the lemon curd: While the cheesecake bakes, heat the lemon juice in a small nonreactive saucepan over medium heat until hot but not boiling. Whisk the eggs and yolk in a medium nonreactive bowl; gradually whisk in the sugar. Whisking constantly, slowly pour the hot lemon juice into the eggs, then return the mixture to the saucepan and cook over medium heat, stirring constantly with a wooden spoon, until the mixture registers 170 degrees on an instant-read thermometer and is thick enough to cling to a spoon, about 3 minutes. Immediately remove the pan from the heat and stir in the cold butter until incorporated; stir in the cream, vanilla, and salt, then pour the curd through a fine-mesh strainer into a small nonreactive bowl. Cover the surface of the curd directly with plastic wrap; refrigerate until needed.
5. To finish the cake: When the cheesecake is cool, scrape the lemon curd onto the cheesecake still in the springform pan; using an offset icing spatula, spread the curd evenly over the top of the cheesecake. Cover tightly with plastic wrap and refrigerate for at least 4 hours or up to 24 hours. To serve, remove the sides of the springform pan and cut the cake into wedges.
Hi Jo, I don’t think you would need to make any alterations to add the lemon juice and zest.
OMG!!! This looks amazeballz :-) Can I use Oreo instead of the graham cracker? And if so do I have to keep the Oreo cream? I hate too sweet a dessert.
Thanks,
Shonann- Jamaica
Hi Shonann, Sure you could use an Oreo crust! I’ve never made an Oreo crust and removed the cream centers, but I’m sure that would be fine.
I have made this recipe several times using various toppings. However, I made it with store bought crust and only used half of the recipe for a smaller cake. In addition, I surround the stawberries with crushed walnuts to finish this off. I’d love to share my pics if it’s possible.
I started making this cake, but I realized I don’t have enough time to bake it because I have to go to work in an hour. Would you suggest I leave the crust and filling separate and refrigerate the filling? or should I cover it and leave it on the counter? Help!
Hi Emily, I would keep the crust and filling separate and refrigerate.
HOLY COW. This was the best cheesecake I’ve ever made! SO SO good. Seriously- it was amazing. This is my new cheesecake recipe and I don’t see myself going back to the 1/2inch chunky pathethic stuff I used to call cheesecake any time soon. Thanks for the awesome recipe.
What method were you using to heat up your kitchen towel before wrapping it around the pan?
Hi Lisa, I run it under scalding hot water then wring it out really well.
hey Michelle, I really do love the recipe and I can’t wait to try it out this weekend. just wanted to ask, is it possible to change this recipe into cupcakes instead? is there anything I need to change? thanks so much!!
Hi Shanice, I haven’t tried making this recipe into cupcakes. I would drastically reduce the baking time and maybe omit the high temperature start.
at what temperature should I bake the cupcakes at then and for how long? how would I have to modify step 6? so sorry for the many questions, I’m just worried that it’ll turn out all mushy!
Hi Shanice, I would recommend 350 degrees F for the entire time. Yeah I wouldn’t start it high then reduce, I would just bake it at 350. As for the time, I couldn’t say since I haven’t tried to do it, but I would probably start checking around 15 minutes or so to make sure you don’t overbake them.
hey I just wanted to ask if it’s possible to make the cheesecake without crust? thanks so much! :-))
Hi Nicole, You could, it just might be slightly more difficult to remove from the pan cleanly.