How to Make Sushi at Home: Sushi Rice & The California Roll

After five years of suffering through some awful food allergies, I was re-tested (3 years ago now) and given the all-clear. Amazingly, I had outgrown the rash of food allergies that I had somehow “grown into” during my mid-20’s. Having been allergic to peanut butter and nuts for those five years, the first way I celebrated was with a spoonful of peanut butter, and then a couple of days later my Chief Culinary Consultant presented me with some Reese’s BIG Cups (drool). Next on the list (to celebrate no longer having to avoid seafood) was to have my first sushi experience. I was hesitant at first, and I wasn’t sure if I would like it. My CCC suggested giving it a try with some cooked seafood, such as shrimp tempura. I took his advice, and it was love at first bite. I never thought I would like sushi, and then found myself craving it at times. Isn’t it awesome how our taste buds can surprise us every now and then?

A little over a year ago I started talking about wanting to learn how to make sushi at home. When you order sushi, it always comes out looking so perfect and pretty, it seemed that doing it at home was just out of reach. However, my sister surprised me last Christmas with a sushi class. We went (about a year ago now!) and learned about sushi rice, as well as how to make a number of different popular rolls, including California rolls, tuna rolls, and dynamite rolls. I ate the California rolls before I thought to take a picture, but below are the tuna and dynamite rolls from our class, courtesy of a cellphone camera:

Save This Recipe
Amazingly, after we took that class, I didn’t use what we learned at home until now! Shame on me! However, after making everything at home, from the sushi rice to the rolls, I was reminded of how easy it really is, and how much fun you can have making your own varieties. My hope is, through the step-by-step tutorial below, to break down the mystique of sushi so you feel comfortable and confident enough to try it at home. I think it would make for a great Valentine’s Day dinner in, as well!

A couple of notes on the recipe below:
- I found the sushi rice, the unseasoned rice wine vinegar, and the nori sheets all in the Asian aisle of my local supermarket. If you can’t find it at your regular grocery store, you might need to try an Asian grocery in your area.
- The recipe for the rice looks long, but don’t be intimidated – it’s just very thorough. The whole process from beginning to end takes less than 40 minutes.
- When it comes to making sushi, practice definitely makes perfect. The more you make it, the better feel you will have for the rolling and cutting. I’ve made it twice this week, and it’s amazing how much prettier my second set of rolls looked versus the first! (Incidentally, the sushi you see pictured here was the first batch.)

What’s your favorite type of sushi, and have you ever made it at home?
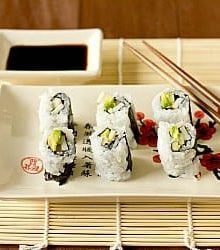
California Rolls (including Sushi Rice)
Ingredients
For the Sushi Rice:
- 2¼ cups (416.25 g) sushi-grade rice
- 2¼ cups (562.5 ml) water
- 5 tablespoons unseasoned rice vinegar
- 1½ teaspoons (1.5 teaspoons) sea salt
- 2 tablespoons granulated sugar
For the California Rolls:
- 1½ cups (252 g) crabmeat, 7 ounces or 7 sticks faux crabmeat
- Fourteen ½-inch-square, 4-inch-long cucumber sticks
- ½ (0.5) pitted large avocado, cut into 14 long sticks and peeled
- Toasted white sesame seeds, to garnish
- 7 half-sheets nori
- 6 cups (1.04 kg) prepared sushi rice, the entire yield from the recipe above
Instructions
- 1. Make the Sushi Rice: Pour the rice into a fine-mesh strainer, large enough so you can freely toss and turn the grains. Have at hand a larger bowl into which the strainer can easily fit and fill it with cold tap water. Pour the rice into the strainer, then lower the strainer into the large bowl so that the water covers the rice. With both hands, gently rub, turn, and toss the rice. Do not press the grains too hard against the strainer or against one another, or the fragile grains may break. The water will instantly turn milky white, so remove the strainer from the large bowl, discard the water, and refill the bowl with fresh cold water. Return the rice-filled strainer to the bowl and repeat. On the second rinsing, the water will look only slightly milky. Repeat twice more. When you have finished, the water will be almost clear, but it will not reach 100% clarity. Drain the rice and let it sit in the strainer for 10 minutes.
- 2. Transfer the rice to a heavy-bottomed pot that is deeper than it is wide and has a heavy, tightly fitting lid, add the water, and let it sit for 20 minutes.
- 3. Set the rice over medium heat and cook, uncovered, until the water has nearly absorbed the rice, about 10 minutes. Quickly reduce the heat to very low, cover the pot with the lid, and cook until the rice is plump and cooked through, another 10 minutes. The rice should now be completely transparent. If you see any dry, very white-looking grains, sprinkle a little warm water over the dry spots and cook another couple of minutes or so over very low heat. During the cooking, never stir the rice.
- 4. After confirming that all the rice grains are transparent, immediately put the lid back on before the built-up steam can escape. Turn off the heat and let the rice stand for 5 minutes.
- 5. While the rice is cooking, put the rice vinegar, salt, and sugar in a bowl and stir with a whisk until the sugar and salt are almost dissolved.
- 6. If you are using a wooden sushi tub and wooden paddle, soak them in a bath of cold water for half an hour while the rice is cooking. Drain the water and wipe the tub and paddle with a dry kitchen towel. Other bowls made of metal, glass, or porcelain can be substituted.
- 7. Transfer the steaming hot cooked rice all at once to the bowl. Quickly and gently break up the rice, crisscrossing it with the side of your paddle. Pour the prepared vinegar dressing evenly over it and, with the paddle; break up the lumpy clumps and turn the rice over, working one area at a time. Repeat once or twice until you can tell by looking that the vinegar dressing is roughly distributed throughout the rice.
- 8. Push the rice toward one side of the tub. Hold the paddle horizontally and rapidly move it back and forth with many small strokes. Work on the remaining areas of the rice one at a time in the same way, until you have moved all of the rice to the other side of the tub. Rotate the tub or bowl 180 degrees and repeat the process. The whole procedure should take about 2 minutes.
- 9. With a hand fan or with a magazine or folded newspaper, fan the rice for about 30 seconds. Let the sushi rice cool to a temperature of 104 degrees F before using, covered with a moist kitchen cloth to prevent it from drying out.
- 10. Make the California Rolls: Line up all the filling ingredients (crabmeat, cucumber, avocado, and sesame seeds) on a tray along with the sushi rice and half-sheets of nori, stacked up in a closed sealable plastic bag. Have at hand a small bowl containing 1 cup of cold water with 2 tablespoons of rice vinegar for moistening your hands and a moistened clean cloth. Open up your bamboo rolling mat and wrap it tightly in plastic wrap. Have a well-sharpened cutting knife at hand.
- 11. Place one half-sheet of nori, shiny side down, on the rolling mat with a long side facing you. Moisten your hands slightly with the vinegar water and pick up the sushi rice (a little less than a cup - about the size of a baseball), forming into a roughly egg-shaped ball without squeezing. Place the rice ball on the nori, ½ inch from the upper far left edge of the nori. Spread the rice evenly to the right, leaving ½ inch of the far end of the upper end of the nori uncovered. Using your fingers, spread the rice towards you, until you have covered the whole area (except for the ½ inch at the top). Sprinkle the surface of the rice evenly with 1 tablespoon of white sesame seeds to form an outer coating for the roll.
- 12. Flip the rice-covered nori sheet over onto the rolling mat, lining up the bottom edge of the mat and the nori sheet evenly. The nori is now on top of the rice. Arrange the crabmeat across the nori from left to right, one-quarter of the way up the side nearer you. Place two sticks of cucumber over the crabmeat and then two sticks of avocado on top of the cucumber sticks.
- 13. To roll, lift up the bamboo mat near you and fold it over the fillings. As you roll and the bamboo mat reaches to the surface of the nori, pull back the edge of the bamboo mat (so that you do not roll it into the sushi) and continue to roll tightly until the whole roll is completed, leaving the seam down the roll. Now place the bamboo mat over the roll, hold it securely to firm it up, and square of the edges slightly. Unroll the rolling mat.
- 14. To cut the roll into six equal pieces, first cut across the center with a sawing motion, not pushing down too hard, then cut each half-roll into thirds, wiping the blade of the knife with the moist cloth to remove the rice residue when necessary.
- Serve the rolls with a spicy mayonnaise, soy sauce, or wasabi. You can prepare this roll several hours in advance. For short-term storage, wrap each uncut roll in plastic wrap, put it in a sealable container, and store it in a cool, dry, dark place. Or for longer-term storage, refrigerate it in the vegetable bin.
Did you make this recipe?
Leave a review below, then snap a picture and tag @thebrowneyedbaker on Instagram so I can see it!


what beautiful homemade sushi. I tried my hand at it a few years back with some success. Never took a class but I read up on it and bought a few of the necessary tools. Haven’t made it since. I adore sushi. Just adore it. We found an all-you-can-eat sushi buffet place near my MIL and it is unbelievable.
One day I will try again. I have been wanting to make it with brown rice. Got to get my hands on some brown sushi rice and then I will try it again. Trying to break my son into eating sushi. I adores fish and seafood.
These instructions are great! I’ve always been nervous about trying to make sushi at home because it’s always looked so intimidating but the way you’ve presented it looks like a lot of fun! I’m with Anna though. Rice cookers make the rice part so much easier! Throw everything into the cooker, push the button and wait for it to be done cooking. It’s idiot proof! :D
using a plastic wrap is a fantastic idea :) i started my blog 2 months ago with my fool proof sushi recipe http://thebeeinthekitchen.blogspot.com/2011/10/starting-food-blog-with-simple-sushi.html :)
I find sushi maiking fun especially with my friends even if it ends up in disaster. Thanks for sharing your story and the recipe. Your experience and the photos sure help.
Congrats for being growing out of the allergies! WOO HOO~ I wish my boyfriend would grow out of some of the allergies he’s developed soon :( he hasn’t had beef, duck or seafood for a while :(
These look great! I love sushi and I love how you’ve reversed it! So the seaweed is inside :D
Really nice tutorial, great pictures!!
Great tutorial! I gave my family the gift of sushi classes last Christmas too. We had a blast and I think it is time for me to make some California and Hand rolls again.
What an inspirational post!! I was given a sushi kit – the mat, the rice paddle, etc. – years ago and even with all the cooking I do, it’s been sitting, untouched, in a cabinet. This has inspired me to get it out and start making some sushi!
My favorite roll! Love this.
The husband doesn’t eat sushi at all. He cannot tolerate the smell of Nori sheets :( I love sushi but have to only eat out .
I did this years ago and haven’t thought about it since. I think I’ll try it with my kids this weekend! Thanks for the inspiration – I totally forgot how do-able it was.
That sushi looks amazing! I need to try this out! Thanks for sharing
And now we know why you were looking for nori sheets at Giant Eagle! Looks delicious!
Making sushi in culinary school was definitely one of my favorite lessons! So good, the rice is a definitely something that gets better with time. I heard a lot of great sushi chefs are trained for 25 yrs! Crazy town. Yours looks yummy!
Hi Michelle,
Making sushi is so much fun! Many years ago my sister gave me the idea to bring all the components to a potluck and let everyone make their own rolls. It was a hit! One ingredient that everyone loved to include was strips of omelette.
I developed an allergy to peanuts during my first year of college. After eating PB sandwiches almost every day as a kid. I sure wish I would grow out of my allergy!!! I miss peanut butter!
Hi Danielle, It was the same thing with me! I got re-tested after 5 years just to see, since the doctor said it was possible I could grow out of them. And I did! Definitely think about getting re-tested if it was something that just showed up out of the blue.
Your rolls look delicious.
I never make rolls at home, even I went to a class to learn how to preapre, I found it very difficult, or maybe is just because I’m lazy.
These look so beautiful. You did such a good job making them and great step-by-step instructions.
We made sushi all the time while living in Europe (so expensive there). Best thing I ever bought was a rice cooker. Just throw sushi rice in there with water, then add a little rice vinegar and mirin – let it cool and voila! Makes sushi making MUCH quicker.
How wonderful to find out that you no longer had these allergies! There’s hope for many others who develop them later in life! :) We’ve made sushi rolls at home a few times, and reading this post reminded me that we need to do it again. Yours came out perfectly!
Hey Michelle, next time you make sushi can you post a video of the final steps in making the rice. I’ve made sushi at home loads of times but am unfamiliar with your technique for distributing the vinegar, but it sounds awesome and through. Cheers!
Hi Barbara, Thank you for the feedback! I will definitely add that to my list!
I took a sushi making class last week (you can read all about it here: http://yellebellyboo.blogspot.com/2012/02/sushi-making-class.html) and I was shocked how easy it is to make sushi! You have a great tutorial – thanks for sharing. Lots of sushi making in my future!!
It doesn’t seem to bad to make, but you know what, I think I may sit this one out. I’ll just buy it! :)
Yum!! My 5 year old son is peering over my shoulder and asked to make this for lunch! ;) These are my favorite with extra wasabi. :)
I’ve loved sushi ever since living in Japan for a year after uni – love love love it. I’ve never made it myself, but a friend started showing me how. I want to start myself, so your post is perfect! Love the details instructions. My favorite roll is spicy tuna
What a great idea – this would be such a fun Valentine’s Day treat to enjoy at home! Glad your food allergies cleared up, a world without Reese’s peanut butter cups is a scary thing :)
Cali rolls aren’t sushi! But that’s how everyone starts :D and I’m jealous of your rice making skills.
I think you’re ready to start adding nigiri pieces to your order, or at least a rainbow roll with raw pieces on top. Chaya in Squirrel Hill is my recommendation.
Michelle you never cease to amaze me. I will have to give this a whirl. My sons love this stuff.
Great instructions!
My mom and I always make sushi when I am home in Germany, it’s been a tradition since we were in japan together at age 12 :) There’s so much labor involved, but it’s wonderful family time, and the flavor is so worth it!
My 2011 resolution was to make sushi at home. Didn’t happen. I’ve put it on my 2012 list. Thanks for the inspiration!